Wednesday, February 29, 2012

Breakfast Tacos!

The other night I made the most delightful breakfast for dinner.  I didn't put a lot of thought into it beforehand.  I just had a bunch of avocados and eggs laying around and didn't want them to go bad.  I also wanted to try out a salsa recipe that I found on Pinterest, so I figured I would incorporate all these together into breakfast tacos...definitely a first for me.  Well, it ended up tasting a lot better than planned.  So good, that I ate them three days in a row and decided to blog about them.


Breakfast Tacos

1 avocado, sliced
salsa (follow link above to the recipe I used... so good!)
4 flour tortillas
4 eggs
4 slices of jack or cheddar cheese

Warm tortillas with a slice of cheese on top on a pan over medium heat until cheese starts to melt.  Scramble eggs with a little milk, salt, and pepper.  Top the tortillas and cheese with scrambled eggs, followed by salsa and a couple slices of avocado.  Makes 4 tacos. 
Enjoy!
Pin It

Thursday, February 23, 2012

Super Easy Chocolate-Almond Clusters

I've been trying to eat healthier foods lately.  Now that I have renewed my membership at Costco where you pretty much have to buy everything in bulk, I'm also having to think ahead for my meal planning so we can wisely use everything we buy. The other day I was browsing around and stumbled upon their giant tub of almonds for $9 something. Almonds make for a healthy snack, but I honestly did not see myself eating that many almonds.  Pretty boring snack, if you ask me.  Unless...

I remembered that I had a bag of semi-sweet chocolate chips at home that I hadn't needed to open when I baked cookies last week.  That's when the simplest, yummiest idea came to me.  You know those tubs of chocolate-covered almonds that always cost more money than you want to spend?  I figured that I could make my own at home for so much cheaper.

So I did.

It was so simple, and half healthy. ;)  I just melted one bag of semi-sweet chocolate chips in the microwave, mixed it with 8 ounces of almonds, and voila!


When I was done, I spread them on a greased cookie sheet and left them for a couple of hours so the chocolate could dry.  And the best part... licking the bowl, of course...
:)

Pin It

Monday, February 20, 2012

Experimenting with Mosaics

We spent a couple days at my mother-in-law's house this weekend.  She is an art teacher so she always has good project ideas.  She had bought a big bag of glass tiles of all different colors and a couple of wooden frames from an art supply store.  I made this:


I'm way too much of a perfectionist for my own good... I spent about an hour arranging tiles, trying to get the perfect fade from green to blue to purple to pink.  It was like doing one of those puzzles where you have to push the tiles around to put the picture together, except worse, because no matter how long I worked on it, there was never a right answer.  There always seemed to be room for improvement.  And that, my friends, is why I like math.


After I got my tile arrangement perfect-enough, I spray-painted my wooden frame with a few coats of purple.  Once it was dry, I used wood glue to attach the tiles to the frame.


After the glue dried, we mixed the grout with a little purple acrylic paint to color it and I went to town.


Once the project was wiped clean and it dried, I put it in the bathroom to use as a decorative tray to hold perfumes and bottles.


Pin It

Wednesday, February 15, 2012

Valentine's Day at Home

Ahhh... Valentine's Day.  A good day for greeting card and flower sales.  Oh, and also for geeky Star Wars M&M dispenser sales, like this one I got for my husband:


And this is what he got for me:


I'd much prefer to stay home on Valentine's Day than go out, mostly because of the crowds and poor service you are bound to encounter.  But now that we have a baby, it's not like we could go out on a dinner date even if we wanted to.  I spent a lot of time thinking about what I could make that would be comparable to something I'd want to order in a restaurant.  This is what I came up with:


This is actually a similar filet mignon recipe to the one I posted here, with a couple small changes.  1) I added mushrooms to the pan as I was cooking the filets.  2) I substituted half of the balsamic vinegar for red wine vinegar.  Other than that, it is the same.

For the shrimp pasta, I didn't measure anything, but I'll give you my best estimates for how I made it.

Shrimp Pasta with Cream Sauce

Makes 2 small servings (as seen in pictures). Double recipe to make full-sized portions.

Ingredients:

Shrimp, peeled and deveined
1-2 garlic cloves, chopped
about 6 ounces of spaghetti noodles
3 TBSP butter
3 TBSP cream cheese
1/4 cup of shredded parmesan cheese 
1/3-1/2 cup whipping cream
Olive oil to coat pan

Directions:

Cook shrimp and garlic in the olive oil.  Set aside.  Prepare the pasta according to directions on the box.  For the sauce:  Combine butter, cream cheese, parmesan cheese, and cream in a small sauce pan.  Heat on low, and stir frequently until melted and creamy.  Top pasta with shrimp, followed by cream sauce.  Sprinkle with parsley, and a little salt and pepper if desired. 


For the asparagus, I sprinkled it with a little grated parmesan cheese and roasted it for about 15-20 minutes at 400 degrees.

I spent about $25 on the ingredients for this dinner, and that includes the wine (obviously we don't buy expensive wine).  I'll let you figure out how much of a savings that is from what you would pay at a nice restaurant (and an $8 glass of wine at a restaurant is going to be cheap wine also).  If you haven't prepared a fancy dinner at home before, I highly recommend giving it a try.  As fancy and this dinner looks, it was actually really easy to make.  Chris told me that it was probably the best meal, not just that I have ever made, but that he had ever eaten.  And I don't even consider myself that great of a cook.  You should try it for your next date night.  Really.


Pin It

Thursday, February 9, 2012

Valentine's Day: Not Just for Kids and Lovers

For some reason, this year I'm really into Valentine's day.  And not in a romance and flowers sort of way... more of like a celebration of love and friendship sort of way.  I'm not single, but I'm discovering that Valentine's Day is a lot more fun if it's also shared between friends.  That way, everyone can enjoy it and maybe in future years we can do away with the concept of "Single Awareness Day" altogether.  According to C.S. Lewis, there are four types of love, so why can't they all be celebrated?

Anyway,  I decided to make Valentines for the ladies in my Thursday morning Bible study.  I sort of felt like a kid again.  It was super fun to exercise my creative abilities, and definitely rewarding to bless the other ladies with an unexpected surprise.

I spent some time (& money) at Michaels, and ended up making these fun little Valentine cards:


I tried to make each one unique.  I used a white gel pen and stamps with a white ink pad for the lettering, and then I attached a different scripture to each one.  For the second part of the project, I made white chocolate holiday popcorn.  It is derived from recipe that I found on Pinterest, with a couple of my own changes.  I filled bags full of the yummy treat and attached them to the Valentines with festive ribbon.


...And I packed them in a box and they were ready to go!

Happy Valentine's Day everyone!  I challenge you to find a way to bless somebody you love this week.


White Chocolate Holiday Popcorn

Ingredients:

1 12-oz bag of white chocolate chips 
2 bags of popcorn, popped
1 bag of holiday M&M


Directions:
Melt white chocolate chips in the microwave according to the directions on the package.  I heated mine in 20-second increments, stirring in between.  Heat until melted and smooth.  Pour mixture into popcorn.  Add M&Ms and mix the three together until well incorporated.  Spread onto cookie sheets and leave for about an hour, or until the white chocolate has dried.  Store in an airtight container for up to one week.


Pin It

Thursday, February 2, 2012

Repurposing: Old sweater into boot socks

I have been excited about this project for a while now for a few reasons.  1) It's easy.  2) It's cheap. 3) I have everything I need right here at home.

High socks worn under boots seems to be the trend this winter.  Not being a super trendy person, I have not adopted it... until now.

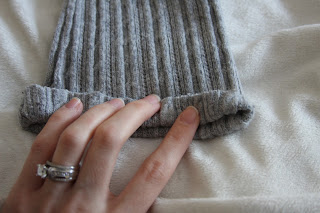
I turned this:


into this:


Soooo easy!  I almost feel like I'd be offending your intelligence by giving you a detailed tutorial, so I'll just let the pictures do the teaching.


I hemmed it by hand, but of course you can use a sewing machine as well.  Then turn them right side out and slip them on!

Pin It

Wednesday, February 1, 2012

Zuppa Toscana!


I found a recipe on another blog for Zuppa Toscana, my favorite soup at Olive Garden, and perhaps my favorite soup of all time.  When I order their unlimited soup, salad, and breadsticks, I can easily inhale three bowls of that stuff.  I had really hoped that this recipe would taste like the real thing, and since the blogger who posted the recipe had never had the soup from Olive Garden, I was a little nervous.  Well, the other night my friend Lisa and I decided to put the recipe to the test and I can now confirm that it does taste very close to the soup from Olive Garden. I ate two giant bowls of it, and then 3 bowls of the leftovers yesterday.  Yum.  


Zuppa Toscana
(I made a couple of my own tiny changes to the recipe)


Ingredients 


1 lb. Italian sausage
3/4 large onion, chopped
3-4 cloves garlic, minced

2/3 cup white wine
½ tsp. red pepper flakes (more if you like it spicy)
2 russett potatoes, peeled and cut into ½-inch chunks
2 cups fresh kale, chopped
3 cups chicken broth
2.5 cups water
1 cup heavy cream
Salt and pepper


Directions


Heat a large stockpot over medium heat.  Crumble the sausage into the pan and brown until done.  Remove from pan and set aside on a paper towel.  Add chopped onion to the pan and sauté until tender (5-7 minutes).  Add the garlic and red pepper flakes and cook for another minute.  Add wine to the pot and stir, scraping the side of the pan to break off any browned bits.  Add the potatoes, kale, chicken broth, and water.  Return sausage to the pot.  Increase the heat to medium high, bring to a boil, then reduce heat to a simmer.  Cover and let cook about 20 minutes, or until potatoes are tender.  Stir in heavy cream and season with salt and pepper.  Serve immediately.


Serves 8


Pin It

Friday, January 27, 2012

Adventures in Sconing


"Sconing" is a word that I invented to mean "the making of scones."  I have made a lot of scones lately.  Four different kinds in the last four months, in fact.  My first attempt were pumpkin scones and I made them because I was excited about the arrival of the fall season.  Unfortunately, the recipe called for nutmeg, ginger, and cloves and I didn't have ginger. So I thought it would be okay if I left it out.  Bad, bad decision.  They had the worst after taste.  I decided from then on, I would always make sure I had every single ingredient before attempting a new recipe.

A couple weeks ago I attended a baby shower and I had volunteered to bring a pastry to share.  I decided that I was not going to let my first failed attempt at making scones stop me from trying again, so this time I decided to make blueberry scones with a lemon glaze.  At the last minute I decided to set aside half of the dough and add chocolate chips to it instead of blueberries (mostly because I don't like blueberries, and by golly, if I was going to spend my time baking them, I wanted to at least be able to enjoy one!).  

At Starbucks, my favorite pastry is the maple oat scone.  SOOOO good.  I want to say they cost something like $2.95 each... too much.  Buy a coffee drink and suddenly you are spending 7 bucks.  For that price you might as well go to Olive Garden for lunch.  Anyway, I searched online for a copycat recipe, and found one.  Yesterday I tried my hand at it, and to my delight, they tasted very similar to the Starbuck's scones.  I will definitely have to make them again.  Even Chris, who isn't overly fond of scones or maple-flavored things, thought they tasted amazing. Next time I go to Starbucks I'll have to save a few bucks and sneak one of these babies in to have with my coffee. :)  

Now for the recipes.


Maple Oat Nut Scones

                                  1 cup oats (quick or old-fashioned)
1 1/2 cups flour
2 tablespoons sugar
1/2 teaspoon salt
1 tablespoon baking powder
2 tablespoons maple syrup
2 1/2 tablespoons cold butter (small pieces)
1 large egg
1/2 cup heavy cream
3/4 teaspoon maple extract
2/3 cup coarsely chopped pecans

Maple Glaze:
1 1/2 cup powdered sugar
1/2 teaspoon maple extract
equal parts water and maple syrup (just a few teaspoons of each)

Preheat oven to 425°F.
Using a food processor or blender, finely grind oats.
Mix together flour, oats, sugar, salt and baking powder.
Cut in butter and maple syrup until dough forms coarse crumbs. Mix in pecans.
In a small bowl, beat the egg with the cream and maple extract.
Pour the egg mixture into the flour mixture and fold together.
Place dough on a lightly floured surface. 
Knead and pat dough into a 8 to 10 inch circle and cut into 8 wedges.
Spray a baking sheet with cooking spray. 
Place wedges on top and bake for 13 to 15 minutes, or until light brown.
Remove scones from oven and let cool about 3 to 5 minutes.
Mix glaze ingredients until smooth. 
Adjust the amount of water & maple syrup to get to the desired consistency (just a few teaspoons of each). 
Spread glaze over each scone and dry about 15 minutes before serving.


Blueberry (& Chocolate Chip) Scones:

2 cups all-purpose flour
1 tablespoon baking powder
1/2 teaspoon salt
2 tablespoons sugar
5 tablespoons unsalted butter, cold, cut in chunks
1 cup fresh blueberries (or chocolate chips)
1 cup heavy cream, plus more for brushing the scones

Lemon Glaze (for blueberry scones):
1/4 - 1/2 cup freshly squeezed lemon juice
1 1/2 cups confectioners' sugar
1 tablespoon unsalted butter

Preheat the oven to 400 degrees.
Mix together the dry ingredients; the flour, baking powder, salt, and sugar. 
Using a pastry blender (or two forks), cut in the butter until mixture resembles coarse crumbs. 
Fold the blueberries (or chocolate chips) into the batter. (Try not to mash the blueberries because their color will bleed into the dough. This part was tricky for me! The chocolate chips were a lot easier.) 
Make a well in the center of the mixture and pour in the cream. 
Fold everything together just to incorporate.
Press the dough into an 8-inch circle and slice into 8 triangles. 
Place the scones on a greased cookie sheet and brush the tops with heavy cream. 
Bake for 15 to 20 minutes until the edges begin to brown. 
Let the scones cool for a few minutes before you apply the glaze.
For lemon glaze: Melt the butter for the glaze in the microwave. 
Whisk together the powdered sugar and lemon juice. 
Add melted butter and whisk until smooth. 
Drizzle glaze over the top of the scones.


Pin It

Monday, January 23, 2012

Date Night: What to do about the baby & the budget?

As anyone who has raised an infant knows, it can sometimes be hard on your relationship. It is even harder when you don't have the convenience of nearby family who can provide free babysitting.  My husband and I rarely get to go on a real, honest-to-goodness date.  In fact, I think there was 3 months between our last two dates.  So we improvise.  The other day I decided that after I put Ethan to bed that night I would make us a nice dinner and eat it while we watched a movie.  It was Saturday and we had hardly any food in the fridge, so I left the kiddo with Chris and went out in search of some good grub.  I ended up stopping at two different stores.  I bought:  

Filet mignon (which I had never prepared, but it was on sale at the grocery store)
A bag of mixed greens
A bottle of Shiraz 
A large wedge of Brie cheese
Crackers
A pound and a half of dark chocolate covered almonds for dessert

Spent just over $25.  Pretty economical if you ask me, considering a full course dinner like this in a restaurant would likely cost two people between $75- $100 after tax and tip, not to mention the cost of a babysitter.

I highly recommend buying your wine and cheese at Trader Joe's.  They tend to have a better selection and prices than the grocery store.  I also bought the chocolate-covered almonds at TJ's.  They were selling 24 oz containers for the same price as the grocery store's 16 oz container.  Gotta love that place.

Aside from the fact that I had to prepare the food myself, it was the ideal meal.  I followed a simple recipe for the meat that only took 15 minutes, tossed the salad greens with some apple slices and candied walnuts that I had on hand, poured a couple glasses of wine, and we had dinner.  I've included the recipe I used for the meat below. Chris thought the sauce was so good that he was drinking it straight from the pan when the filets were done cooking.

And because pictures are worth a thousand words, here are a few...


Filet Mignon with Balsamic Glaze

2 filet mignon steaks
salt and pepper to taste
1/4 cup dry red wine 
1/4 cup balsamic vinaigrette
1 TBSP brown sugar
1-2 garlic cloves, minced

Let the steaks sit out at room temperature for 30 minutes before cooking.  Mix together the wine, balsamic vinaigrette, and brown sugar.  Set aside.  Season steaks with salt, pepper, and minced garlic.  Heat a tablespoon of olive oil over medium-high heat on a skillet.  Once the pan is hot, add the steaks.  Brown for 1 minute on each side.  Reduce heat to medium-low, and add wine and vinaigrette mixture.  Cover and cook steaks 4-5 minutes on each side, basting with the sauce as you turn them over.  Serve steaks with sauce drizzled on top or serve sauce on the side for dipping. 
Pin It

Friday, January 20, 2012

Sweet Dream Room


We've lived in our current home for about 7 months now.  This space is about 700 square feet larger than the apartment we moved from, and considering we'd only lived here for 11 days when our son was born, it goes without saying that it took me a while to get the place organized and decorated.  Some rooms are still a work in progress. 
Lately, I've been hopelessly addicted to Pinterest.  My "Home" board is filled with pictures of wonderful ideas, most of which I can't afford, but still, it's nice to dream.
I've had a lot of fun the past few months decorating our master bedroom.  It is a fairly large room with these nice French doors that hardly serve a purpose, but are at least pretty to look at.  I decided to paint it a dark golden yellowish color (Behr's "Warm Muffin"), which was a bold choice for me.  I usually like to play it safe with neutral colors, earthy greens, or blues. My inspiration for the colors came from this picture:

I still really love this bedroom.  It is a lot more "country" than our room ended up being.  My original intention was to recreate this room as identically as I could, but slowly my creation drifted in its own direction, which ended up being ok with me. My yellow ended up being a warmer tone, and my red accents are less of a rust red and more maroon.  I'd like to say that I'm done decorating our room, but I have a feeling that as long as there are stores selling cool things it will continuously be evolving. 
Here are some pictures of the sort-of-finished product:


We got a new king size Tempurpedic bed, which I highly recommend.  The pros: You can jump up and down on it and your wine glass will not tip over.  You will never find a more comfortable bed. Con: You will never find a more comfortable bed. This means that whenever you travel you will be sorely disappointed in the bed you will sleep in.  We got our bed frame, end table, dresser, and matching lamps from Costco.  Amazing quality.  Amazing price.  I MUST renew my membership.  Or maybe I'd better not.

Pin It